This is a step-by-step Citrix XenApp installation guide created to help you quickly deploy and configure XenApp solution in your environment.
For those of you who have stumbled upon the XenApp for the first time, let me explain what actually XenApp does.
Citrix XenApp is application virtualization software that allows Windows applications to be accessed via individual devices from a shared server or cloud system without the necessity of installing them. With XenApp, Windows applications can be used on devices that typically could not run them (such as Mac computers, mobile devices…), but also it enables otherwise incompatible apps to run on Windows desktops.
The latest released version is Citrix XenApp 7.13., and this is the one we used for this guide.
Citrix XenApp Installation & Configuration
The following steps will guide you through the installation and configuration of Citrix XenApp including the installation of the Virtual Delivery Agent and application publishing process.
The environment used for this XenApp installation guide consist of three servers, all running on Windows Server 2016:
XA7-13-DC – Delivery Controller and Citrix License Server
XA7-13-VDA-1 – Virtual Delivery Agent
XA7-13-VDA-2 – Virtual Delivery Agent
The separate server will be used for storing Citrix databases.
Delivery Controller Installation
The installation starts with a screen where you can choose whether you want to install Citrix XenApp or XenDesktop solution. Select the XenApp option.
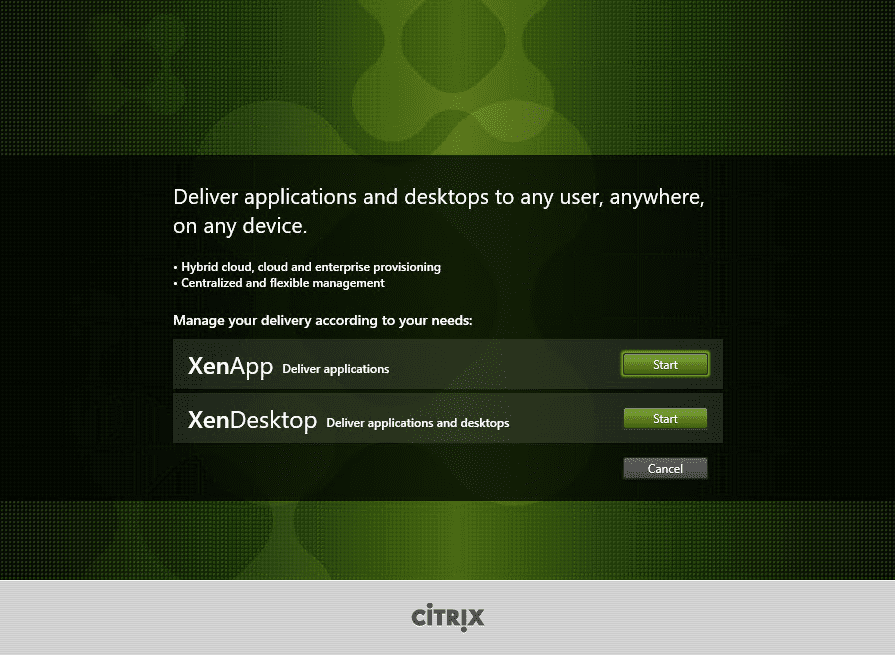
Start screen
The next screen shows all available XenApp features to install.
Having a Delivery Controller in every XenApp infrastructure is necessary so select „Delivery Controller“. This will start the installation wizard. In the first step accept the license agreement and click „Next“.
The second step regards the Core Components, simply leave the default values and click „Next“. On the Features tab there are two options, „Install Windows Remote Assistance“ and „Install Microsoft SQL Server 2014 SP2 Express“. Make sure that second option remains unselected if you have the SQL Server on which you can store the Citrix databases.
If you don’t have SQL Server on which you can store Citrix databases, select both options and proceed to the next step.
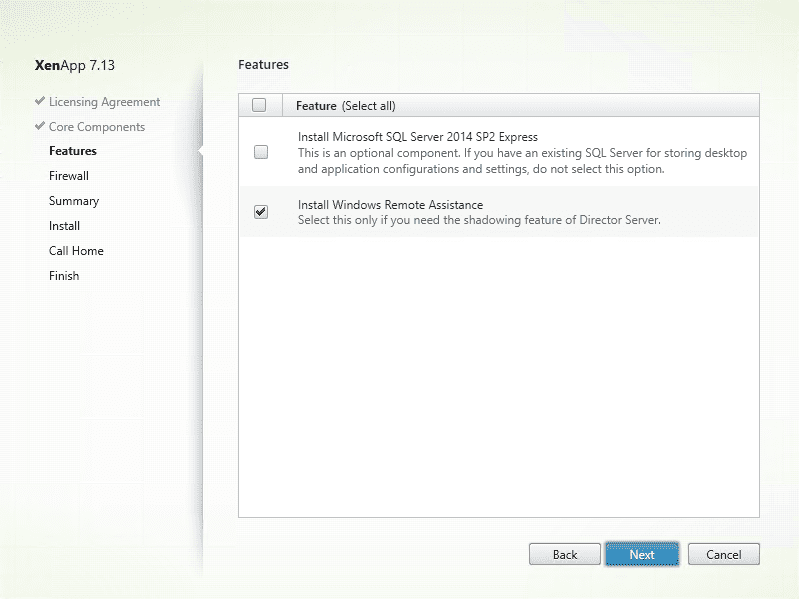
Features tab
Now you need to configure the Firewall Rules. It can be done manually, or you can let the Wizard create them automatically. Choose „Automatically“ and proceed.
Review the selected options and click „Install“.
When the installation finishes, the wizard will ask if you want to use the Call Home functionality. It monitors your deployment for common errors, automatically uploads system data to Citrix, and then notifies you before issues become real problems.
If you do not feel like participating in Call Home, click „Next“ and on the following tab click „Finish“.
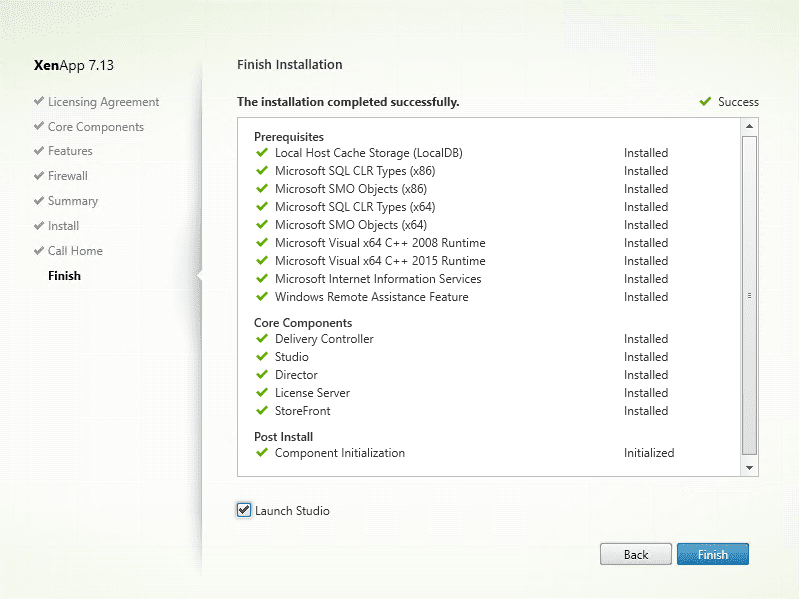
Successful installation
Installing XenApp management server is a lot easier than before when you had to run multiple installation wizards from which all had to finish successfully.
Virtual Delivery Agent Installation
After you’ve installed Delivery Controller, you need to install the Virtual Delivery Agents (VDA). The Virtual Delivery Agent (VDA) enables connections to applications and desktops. The VDA is installed on the machine that runs the applications or virtual desktops for the user.
The installation process is very simple; you need to open the same setup as you did for the Delivery Controller installation, and choose „Prepare Machines and Images Virtual Delivery Agent for Windows Server OS“. This will start the wizard which will lead you through the installation process.
The first step of the wizard is the Environment setup where you need to choose whether you want to create a Master Image or enable connections to a server machine.
If you choose the first option, you will create a Master Image which you can then use for creating servers (so-called Gold Image). The second option will install VDA on the server. We are configuring application delivery so select the second option.
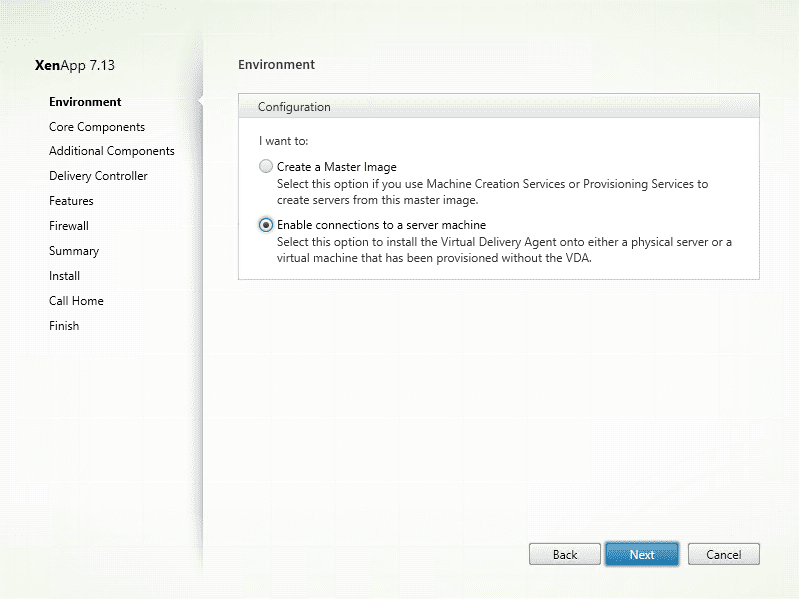
Environment setup
Next step in Virtual Delivery Agent installation is Core Components.
There are two Core Components, Virtual Delivery Agent and Citrix Receiver.
VDA is required and cannot be unselected while Citrix Receiver is optional, but install it anyway. Receiver enables you to connect to the VDA server and access published applications.
On the next step, you can choose whether you want to install any additional components. In this scenario, we don’t need any so you can leave all options unchecked and click „Next“. On the Delivery Controller step, under the question „How do you want to enter the locations of your Delivery Controllers“ choose „Do it manually“ option from the drop-down menu.
Type in the Delivery Controller FQDN in Controller Address field and click „Test Connection“. If the green checkmark appears that means that the Delivery Controller is accessible and you can use it. Click „Add“ and then proceed to a next step.
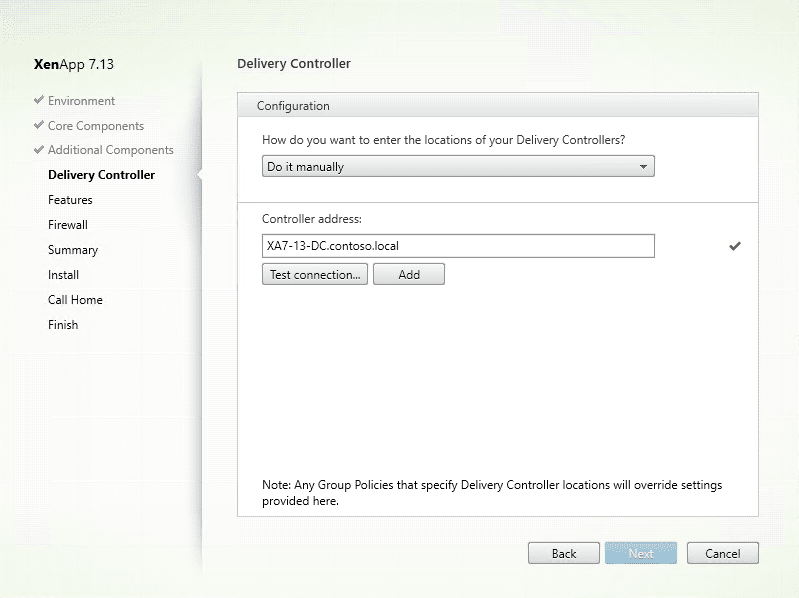
Delivery Controller setup
On the Features step, you can leave the default values and proceed. In the next step, you have to configure Firewall Rules, configure them manually or you can let the wizard create them automatically. On the Summary tab, review the selected options and click „Install“. The server will reboot twice during the installation process.
When the installation finishes, the wizard will ask whether you want to use Call Home functionality. Choose „I do not want to participate in Call Home“, click „Next“, and on the following tab click „Finish“.
Delivery Controller Configuration
After you’ve installed the Delivery Controller and Virtual Delivery Agents, you need to perform the Site Setup and create the Machine Catalog, Delivery Group, and the Application Group.
Site setup
Open the Citrix Studio on the Delivery Controller server and click on the „Deliver applications and desktops to your users“.
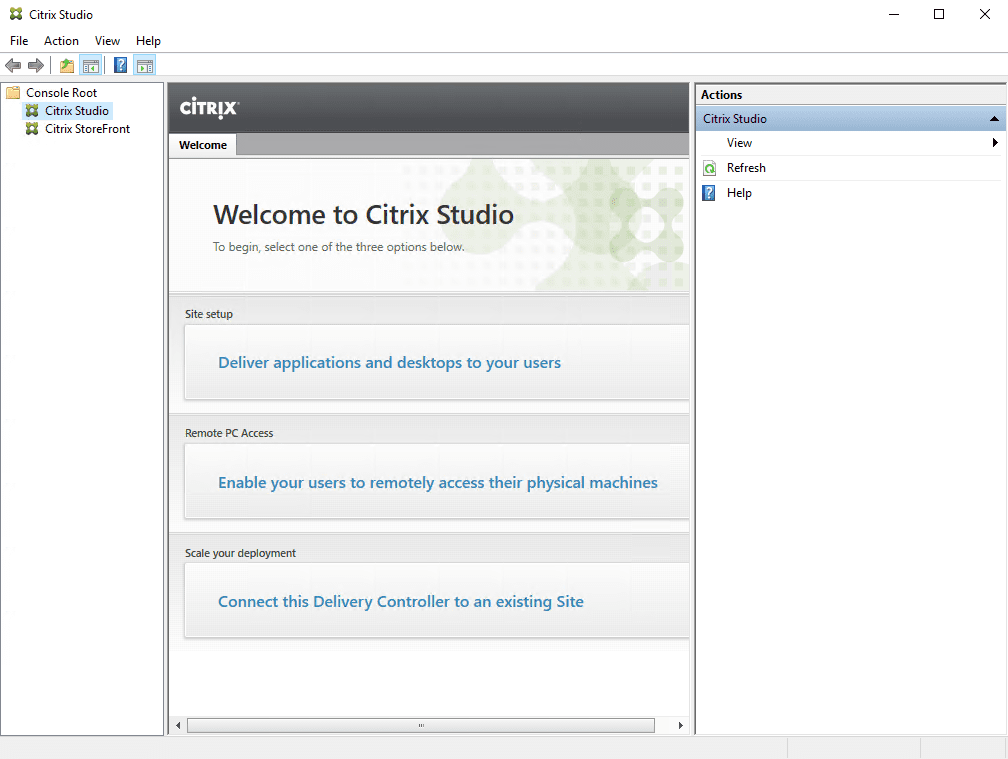
Citrix Studio
This will open the Site Setup wizard. In the Introduction step enter the name of the site and click „Next“. On the Databases step enter the database server and the names of the databases.
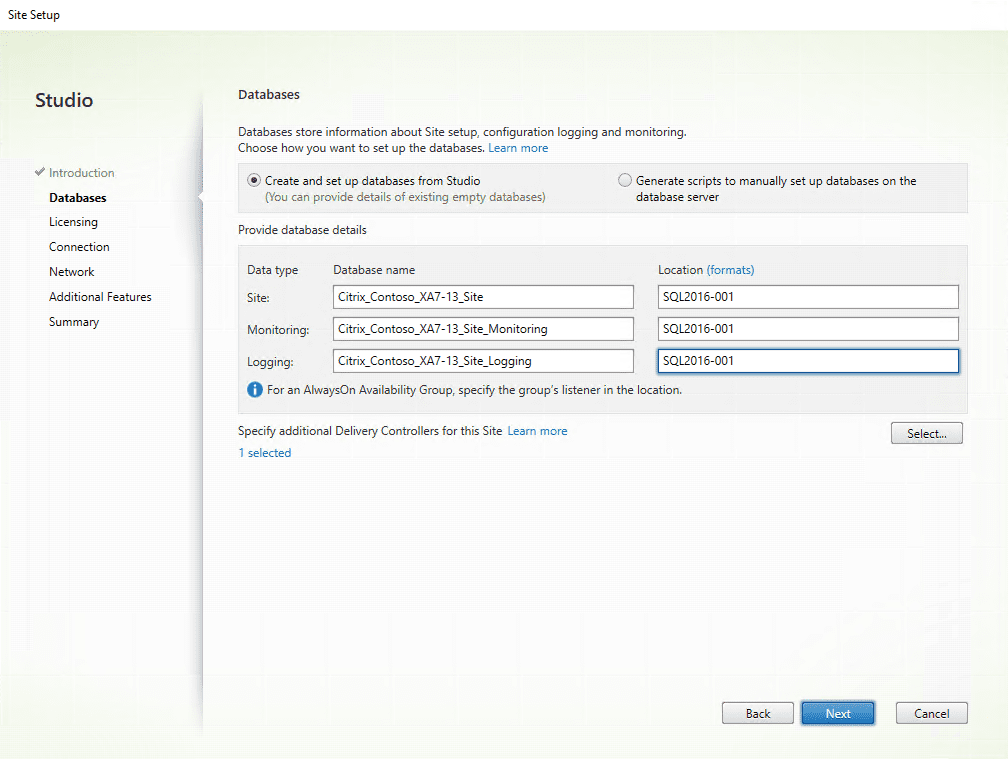
Site setup wizard
The next step is Licensing setup. In this scenario, the Delivery Controller is also the License Server so you can leave the default License server address. If you have the license file select „Use an existing license“, browse for a license file and choose the license from the list. If you don’t have one, select „Use the free 30-day trial“ and proceed to the next step.

Citrix licenses
On the Connection step, select from the Connection type drop-down menu „No machine management“ and proceed to the Network step. If you use the machine management software like VMware vSphere or Virtual Machine Management from the System Center you can use this step for setup. You don’t need any additional features for this setup so you can leave them unchecked and proceed. The last step is Summary, simply review the selected options and click „Finish“.
Machine Catalog setup
After you’ve created Citrix Site you need to setup the Machine Catalog. Machine Catalog is a collection of physical or virtual machines that you assign to users.
To start the Machine Catalog Setup wizard click on the „Set up machines for desktops and applications or remote PC access“ button in the Citrix Studio.
The first thing you need to do is to choose Operating System. You can choose between Server OS and Desktop OS. Both of these options are only relevant for the desktop publishing, and since we are doing only application publishing, you can leave the default value and proceed. On the Machines step, you can add machines to the Machine Catalog. Click on the „Add Computers“ button, select the machines where you’ve installed the VDA and click „Next“.

Machine catalog setup
The last step is Summary. Review selected options, type in the Machine Catalog name and finish the wizard.
Delivery Group setup
Next thing on the configuration list is the Delivery Group. Delivery Group is a collection of desktops and applications that are created from Machine Catalogs.
To start the Create Delivery Group wizard click on the „Set up Delivery Groups to assign desktops and applications to your users“ in the Citrix Studio. In the first step of the wizard you need to select the Machine Catalog. Select Machine catalog you have created earlier and chose the number of the machines for the Delivery Group.
In this scenario, we only have two machines in the catalog, so set the number of machines to 2.

Delivery group setup
The next step is Users.
In this step, you need to specify who can use the applications and desktops in the delivery group. Select „Restrict use of this Delivery Group to the following users”. Add the users or groups that need to have access to the applications, and proceed to the next step.
In the Applications step, you can select the applications that you want to publish. Leave that empty and click „Next“. We will add the applications later when we create the Application Group. We will not publish any desktops in this scenario so leave all the defaults in the Desktops step and proceed.
The last step is Summary. Review the selected options, type in Delivery Group Name and click Finish.
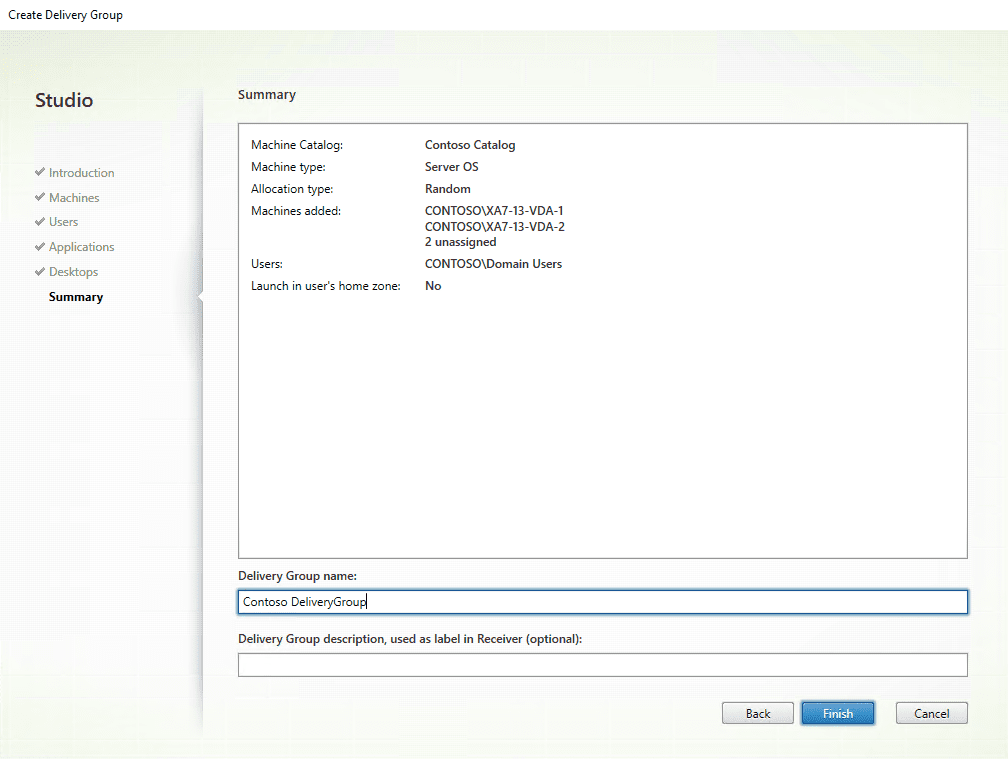
Delivery group name
After you’ve created the Delivery Group, you need to create Tags for the VDA machines and the Application Group.
To create the Tag go to Search tab in the left panel of the Citrix Studio and select „Server OS Machines“ tab in the middle panel.
Select both machines, right click on one of them and select „Manage Tags“. This will open Manage Tags window. Click on the „Create“ button, enter the Name and Description of the Tag, click „Ok“ and then „Save“.
This procedure will automatically assign Tag to both machines.
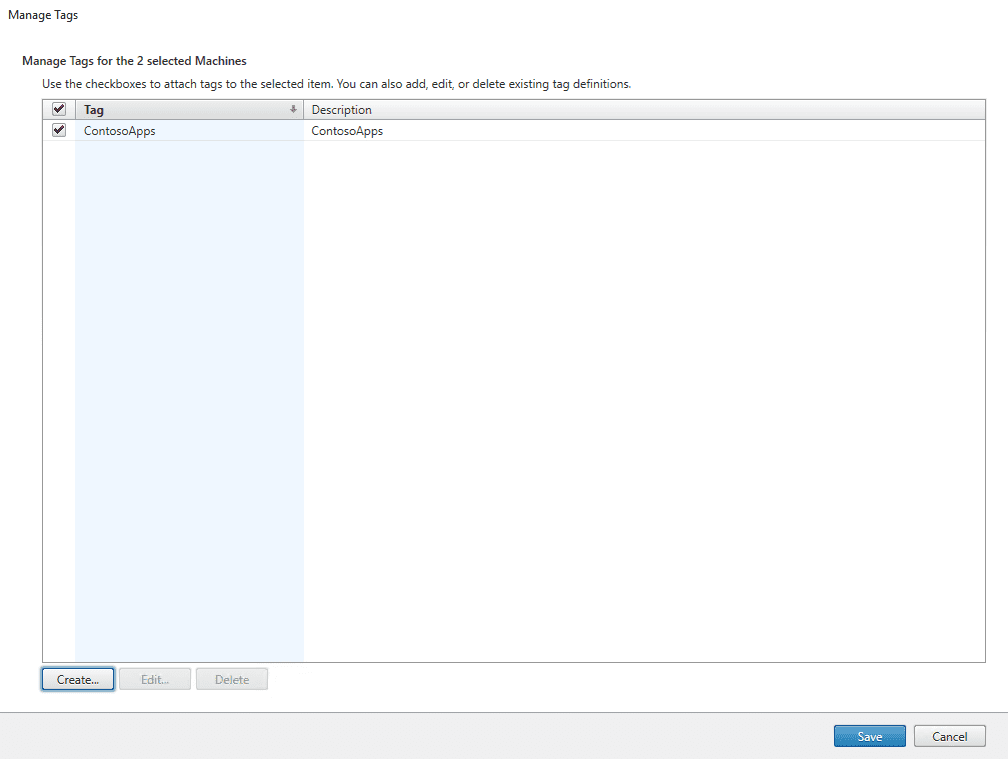
Manage tags
After you’ve created Tag, go to the Applications tab in the Citrix Studio and on the right pane click on the „Create Application Group“ button.
This will start the Create Application Group wizard. You can click „Next“ on the Introduction tab. In the Delivery Groups tab select the Delivery Group that you’ve created earlier.
Also, check the „Restrict launches to machines with tag“ checkbox and select the Tag you’ve created from the drop-down menu before proceeding to the next step.

Application groups
In the Users step select „Restrict use of this Delivery Group to the following users” and add users or groups that need to have access to the applications. The next step is Applications. Click „Add“ and select „From start menu“ from the drop-down. This will open the list of available applications from the VDA servers.

Application publishing
Select applications that you want to publish and click „Next“.
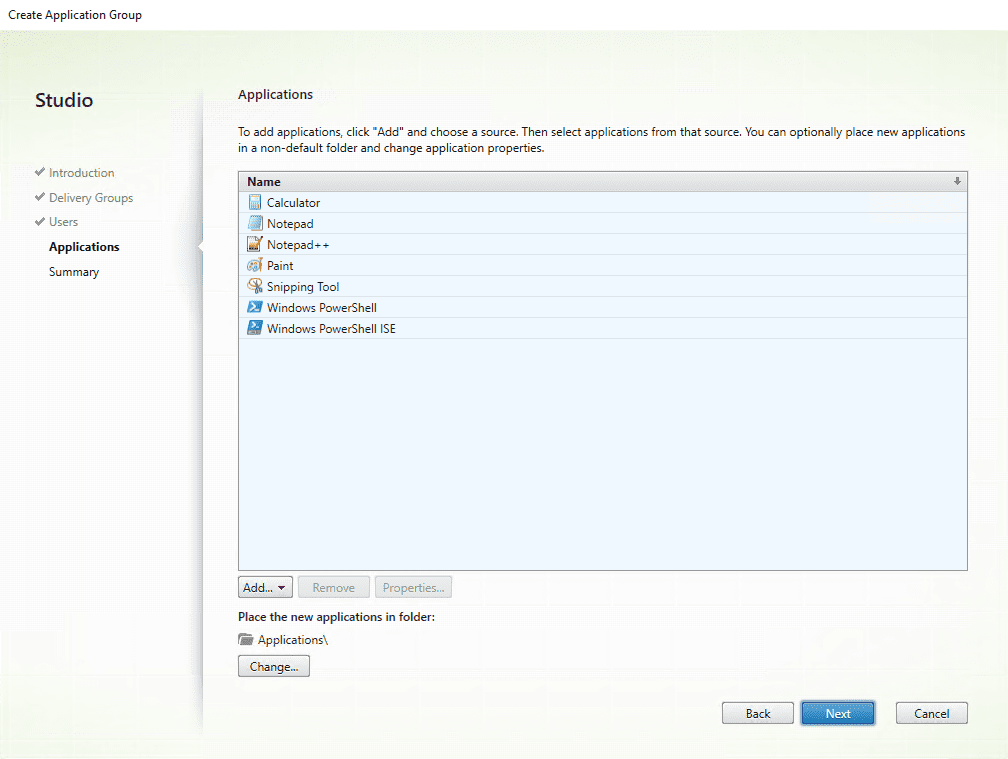
Applications
The final step is Summary. Review the options that you’ve selected, type in Application Group name, and click Finish.
When you publish applications this way, they are delivered to the user from the random VDA with the Machine Tag that you’ve created.
You can also publish applications by just adding them in the Delivery Group, but you won’t have the random delivery from the VDA servers.
You will be able to access your published applications but only on the VDA that was used to retrieve the applications for Add Applications wizard.
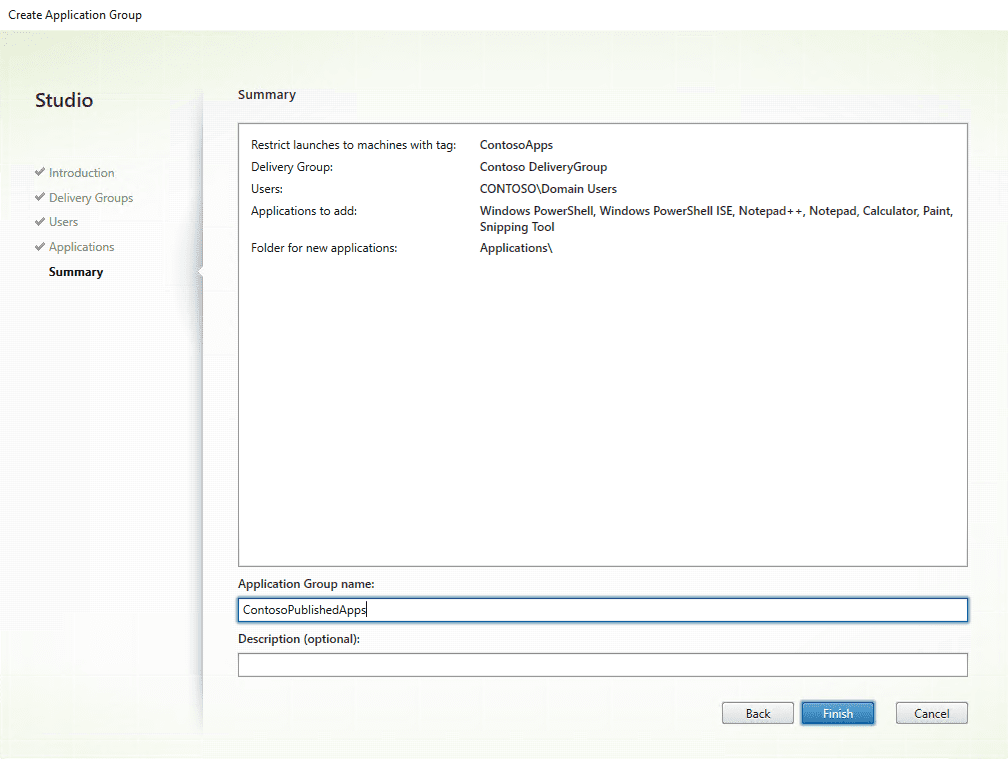
Application group name
You can access your published applications from your Web Browser. The URL for accessing your published applications looks like this http://xa7-13-dc.contoso.local/Citrix/StoreWeb/.
This rounds up our XenApp installation guide, if you have any questions feel free to write me in the comments.